Thêm mô tả vào cuối mỗi danh mục sản phẩm trong WooCommerce. Thông thường bạn thấy mô tả danh mục sản phẩm của WooCommerce sẽ xuất hiện ở trên đầu nhìn khá là xấu và làm cho người dùng không tập chung vào sản phẩm mà lại đi đọc mô tả sản phẩm bên trên, nhiều bạn có hỏi mình làm sao code để đưa cái mô tả danh mục này xuống dưới cho đẹp nhất website. Thì hôm nay đội ngũ kỹ sư của Win Win Media đưa ra giải pháp các bạn cùng tham khảo nhé.
Bạn có thể thêm đoạn code phía dưới vào file functions.php (child theme) hoặc bạn có thể sử dụng plugin WPCode – Insert Headers, Footers, and Code Snippets để thêm code PHP vào.
Đoạn code trên có 4 phần và mình có comment trong đấy bạn có thể đọc và hiểu ngay.
Hiển thị field khi bạn thêm mới danh mục sản phẩm
Hiển thị field khi bạn sử danh mục sản phẩm
Lưu dữ liệu lại khi nhấn save
Hiển thị mô tả SEO vào cuối mỗi danh mục (phần này bạn có thể thay đổi hook vào vị trí mà bạn muốn nhé, hiện tại hook mình sử dụng là woocommerce_after_main_content)
Thêm mô tả vào cuối mỗi danh mục sản phẩm trong WooCommerce
// 1. Hien thi field trong wp-admin – product category
add_action( ‘product_cat_add_form_fields’, ‘bbloomer_wp_editor_add’, 10, 2 );
function bbloomer_wp_editor_add() {
?>
<div class=”form-field”>
<label for=”seconddesc”><?php echo __( ‘Mô tả dưới danh mục’, ‘woocommerce’ ); ?></label>
<?php
$settings = array(
‘textarea_name’ => ‘seconddesc’,
‘quicktags’ => array( ‘buttons’ => ’em,strong,link’ ),
‘tinymce’ => array(
‘theme_advanced_buttons1’ => ‘bold,italic,strikethrough,separator,bullist,numlist,separator,blockquote,separator,justifyleft,justifycenter,justifyright,separator,link,unlink,separator,undo,redo,separator’,
‘theme_advanced_buttons2’ => ”,
),
‘editor_css’ => ‘<style>#wp-excerpt-editor-container .wp-editor-area{height:120px; width:100%;}</style>’,
);
wp_editor( ”, ‘seconddesc’, $settings );
?>
<p class=”description”><?php echo __( ‘Mô tả cho danh mục sản phẩm – hiển thị cuối mỗi danh mục’, ‘woocommerce’ ); ?></p>
</div>
<?php
}
// 2. Hien thi field khi “Edit product category”
add_action( ‘product_cat_edit_form_fields’, ‘bbloomer_wp_editor_edit’, 10, 2 );
function bbloomer_wp_editor_edit( $term ) {
$second_desc = htmlspecialchars_decode( get_woocommerce_term_meta( $term->term_id, ‘seconddesc’, true ) );
?>
<tr class=”form-field”>
<th scope=”row” valign=”top”><label for=”second-desc”><?php echo __( ‘Mô tả dưới danh mục’, ‘woocommerce’ ); ?></label></th>
<td>
<?php
$settings = array(
‘textarea_name’ => ‘seconddesc’,
‘quicktags’ => array( ‘buttons’ => ’em,strong,link’ ),
‘tinymce’ => array(
‘theme_advanced_buttons1’ => ‘bold,italic,strikethrough,separator,bullist,numlist,separator,blockquote,separator,justifyleft,justifycenter,justifyright,separator,link,unlink,separator,undo,redo,separator’,
‘theme_advanced_buttons2’ => ”,
),
‘editor_css’ => ‘<style>#wp-excerpt-editor-container .wp-editor-area{height:120px; width:100%;}</style>’,
);
wp_editor( $second_desc, ‘seconddesc’, $settings );
?>
<p class=”description”><?php echo __( ‘Mô tả cho danh mục sản phẩm – hiển thị cuối mỗi danh mục’, ‘woocommerce’ ); ?></p>
</td>
</tr>
<?php
}
// 3. Save field admin page
add_action( ‘edit_term’, ‘bbloomer_save_wp_editor’, 10, 3 );
add_action( ‘created_term’, ‘bbloomer_save_wp_editor’, 10, 3 );
function bbloomer_save_wp_editor( $term_id, $tt_id = ”, $taxonomy = ” ) {
if ( isset( $_POST[‘seconddesc’] ) && ‘product_cat’ === $taxonomy ) {
update_woocommerce_term_meta( $term_id, ‘seconddesc’, esc_attr( $_POST[‘seconddesc’] ) );
}
}
// 4. Hien thi field trong danh muc san pham – cuoi trang
add_action( ‘woocommerce_after_main_content’, ‘bbloomer_display_wp_editor_content’, 5 );
function bbloomer_display_wp_editor_content() {
if ( is_product_taxonomy() ) {
$term = get_queried_object();
if ( $term && ! empty( get_woocommerce_term_meta( $term->term_id, ‘seconddesc’, true ) ) ) {
echo ‘<p class=”term-description”>’ . wc_format_content( htmlspecialchars_decode( get_woocommerce_term_meta( $term->term_id, ‘seconddesc’, true ) ) ) . ‘</p>’;
}
}
}
Sau khi thêm đoạn code kia vào thì bạn sẽ thấy phần nhập liệu như ảnh này.
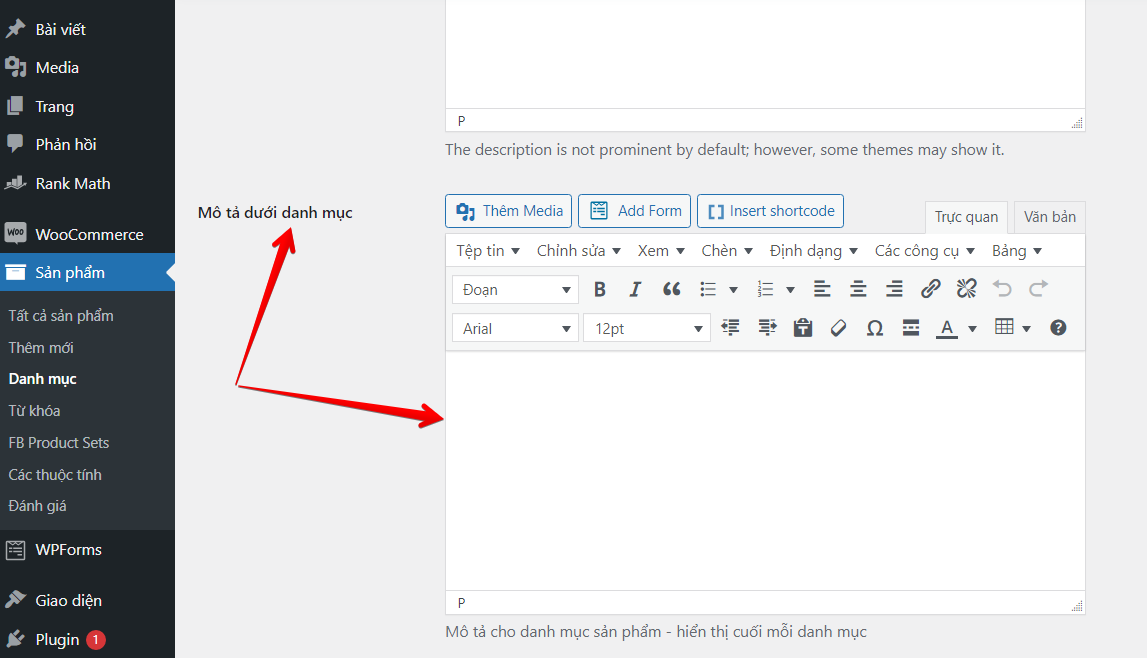
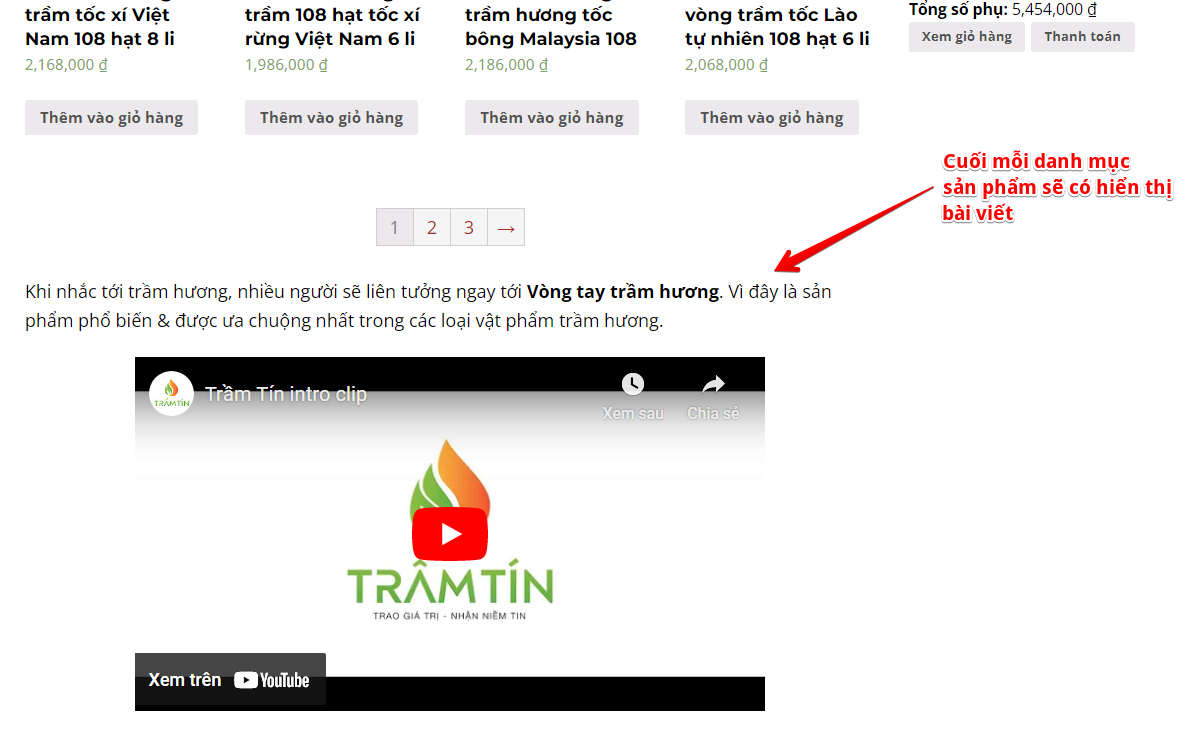
Và khi bạn nhập mô tả vào danh mục sản phẩm thì ngoài website (Frontend) dưới mỗi danh mục sẽ hiển thị đúng yêu cầu như sau:
Xem thêm: Code lọc sản phẩm không có ảnh đại diện trong woocommerce
Như vậy là bạn đã thêm mô tả vào danh mục sản phẩm WooCommerce thành công rồi, hy vọng bài viết ngắn này sẽ giúp ích cho nhiều người.
Chúc bạn thành công !


